Post map
ToggleFor marketers, Google Tag Manager is an effective tool for tracking website activities, especially for managing Google tags quickly without needing to edit the source code. With this tool, businesses can attach tags to their websites to track customer behavior when visiting. This allows you to understand your target audience better, enabling the implementation of more effective marketing campaigns to boost business performance. In this article, let’s explore how to set up and use this tool with Sóc Lửa Agency !
What is Google Tag Manager?
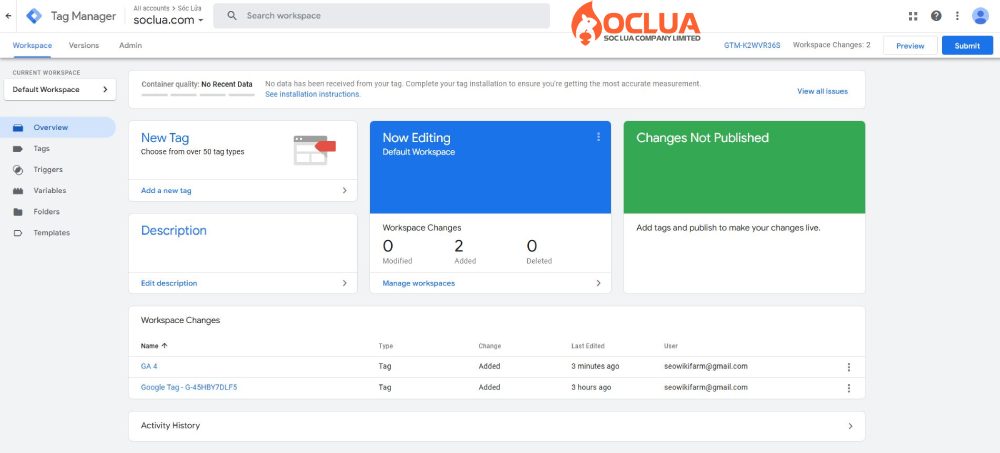
Google Tag Manager (GTM) is a free tag management system provided by Google that allows website administrators to add, modify, and manage tags without needing to edit the code. It serves as an intermediary between the website and other analytics and advertising tools. Instead of directly inserting individual code snippets into each page, you add them to GTM.
When a user visits your website, GTM checks if any conditions are met. If so, GTM will trigger the corresponding code snippets (tags) that have been set up. By creating tags in Google Tag Manager and pasting the tag code, this tool automatically adds the tags to the website.
Tags are snippets of JavaScript or HTML inserted into a website to track user behavior, monitor conversions, and analyze data. Google Tag Manager is used to add tags from various sources such as Google Analytics, Google Ads, etc., helping to improve website performance.
Previously, you had to check each tag on the website, but with Google Tag Manager (GTM), you can monitor all the tags in a single interface. Additionally, using GTM reduces the likelihood of errors compared to directly editing code. Moreover, this tool helps gather user behavior data on the website, track conversion rates, and assess the effectiveness of marketing campaigns.
Components in Google Tag Manager
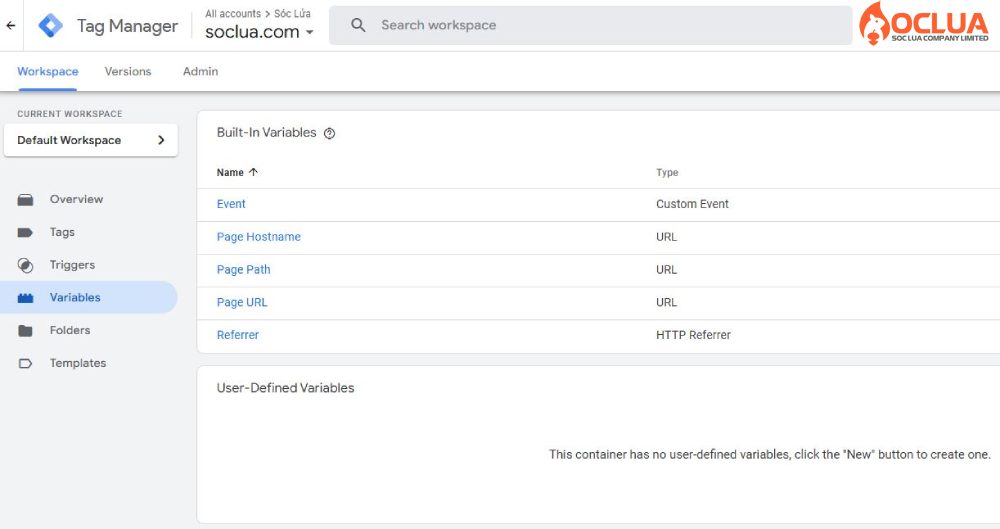
The essential components of Google Tag Manager are:
.
Container
Every website is placed within a specific container, and this container will house many tags that appear together.
Tags
Each tag is a different snippet of code, and when combined, these tags create the commands that operate the website. Tag Manager is understood as a tool for managing tags that appear within the same container. Tags serve various purposes, but they are mainly used to send measurement information from the website/app to tools like Google Analytics and Google Ads. When the Trigger meets the conditions, the Tag will be activated by GTM.
Trigger
This component defines the conditions under which a tag is activated. Types of triggers include page views, clicks, form submissions, YouTube videos, and custom events. For example, if a user views a page and clicks a link, the tag will be triggered. However, you need to specify the trigger for each tag to inform GTM when to activate it. Platforms like Google Analytics commonly use page views as triggers.
Variable
Variables provide additional details to the trigger to ensure that Google Tag Manager activates the tag correctly, such as Path, Click ID, URL, etc. Each element contains multiple variables, and each variable is a component of that element.
Reasons to use Google Tag Manager
Easy to Install and Use
With an intuitive and user-friendly interface, you can easily add, edit, and remove tracking tags without needing advanced programming knowledge. The process of setting up and managing tags is quick and convenient, saving time and effort compared to directly modifying the website's source code. By using Google Tag Manager, you only need to add a small code snippet to your website without relying on developers.
Centralized and Efficient Tag Management
GTM allows businesses to manage tags that track customer actions on their website to improve business and sales performance. Website owners can add, edit, or delete tags with just one click. Managing and tracking tags from a single location helps save time and improves efficiency without requiring code expertise. Centralized management minimizes errors during implementation.
Through Google Tag Manager, businesses can track important website activities such as visits, interactions, and user behavior. This assists in analyzing advertising campaigns and optimizing user experience. GTM supports not only Google platforms but also other analytics and advertising services.
Improves Website Load Speed and High Security
Using analytics tools can impact website performance. However, with GTM, this issue is resolved because tags are implemented separately, ensuring website loading speed is maintained. Only those with access to the website and Google Tag Manager have permission to add or remove monitoring tags.
Improves Conversion Rate
Google Tag Manager enables users to quickly, simply, and efficiently manage and track customer behaviors when visiting the website. Additionally, GTM's testing feature helps measure customer reactions to website pages during specific stages.
Supports SEO Activities
GTM is a valuable tool for SEO professionals by attaching tracking codes to the website. This allows SEO experts to better understand customer behavior when visiting the website. Managing and tracking all website activities helps build strategies to improve website performance, attract customers, increase traffic, and enhance rankings.
How to install and set up Google Tag Manager
Step 1: Add a new Google Tag Manager account
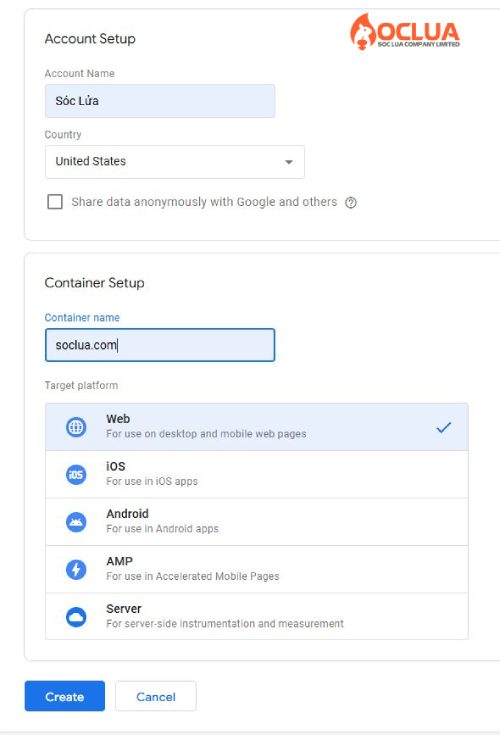
Access Google Tag Manager: https://tagmanager.google.com/ then click Create account. The GTM account creation interface will appear, please fill in all the required information: account name (enter company name or website name), country name. Make sure to choose the correct country name and the correct location, then click Continue.

Step 2: Set up the account and container
Next, select the container including entering the container name and where to use the container by selecting the container platform such as iOS, Android, Web, AMP, or Server. After filling in the information, click the Create button to create an account.
Step 3: Enter the Google Tag Manager code into the website
After selecting Yes, Google Tag Manager will provide the code, please copy and paste it into the website. The window displays the terms of use of Google Tag Manager. Please read and select I agree, then select Yes.
Next, the system will display an interface containing 2 codes. Then copy the first code to paste into the head tag and the second code to paste into the body tag. After completing the code, you need to check whether the installation was successful or not. You need to install the Google Tag Assistant extension into the Chrome browser and make sure it appears on the toolbar.
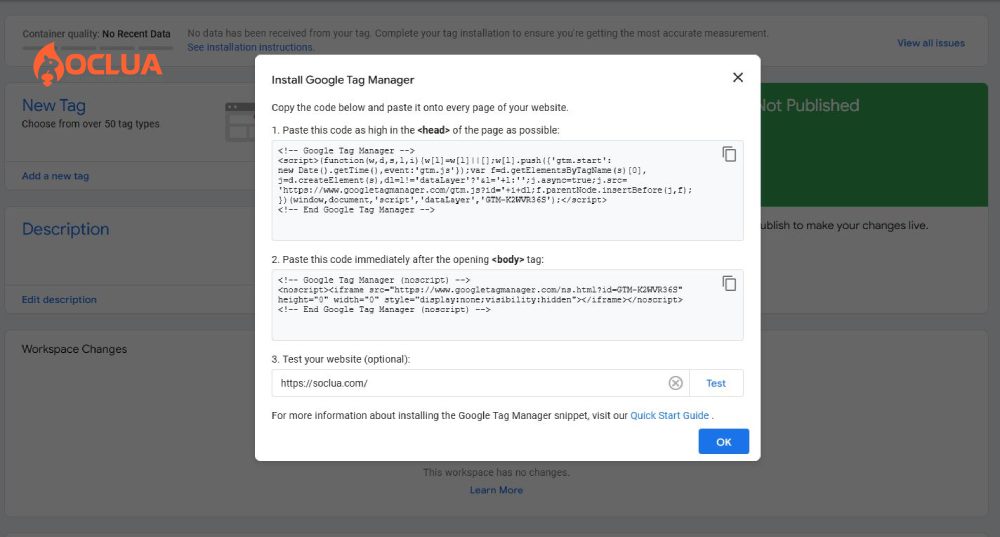
Step 4: Check if the Google Tag Manager code has been successfully installed
After installing the Google Tag Assistant extension into Chrome, access the website to install GTM. When installing later, pin the extension to the toolbar in the upper right corner of the screen. Access Enable and press F5 to reload. Click on the Google Tag Assistant extension icon in the right corner of the screen, the tool will display the statistical results.
Google Tag Manager User Guide from A to Z
Use Google Tag Manager to track conversions
Set up Google Analytics tracking code
Step 1: Access Google Analytics to get the tracking code by clicking Admin, then selecting Property, then selecting Tracking Info and selecting Tracking Code.
Step 2: Log in to Google Tag Manager, then click Variables, then select New to create a new variable.
Step 3: In the next screen interface, select the variable type depending on the purpose of use. If you want to save the Google Analytics tracking code, select Google Analytics Settings.
Step 4: When the dialog box appears, name the variable GA ID and enter the copied value in the Tracking ID section and click Save to save.
Set up the tag
Step 1: In the main interface of Google Tag Manager, select Tags (tags) and then click New to create a new tag.
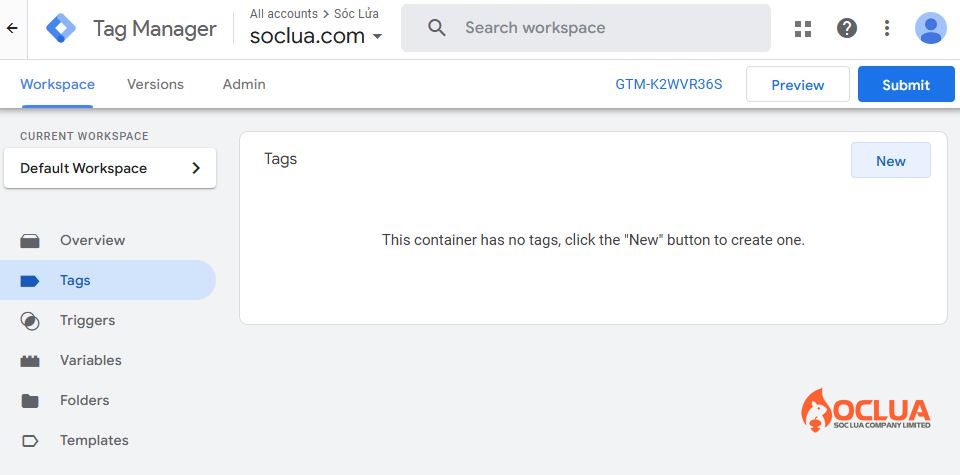
Step 2: The screen will display options, then select Google Analytics - Universal Analytics. Select the Universal Analytics tag type and fill in your Google Analytics account information such as the tracking ID.
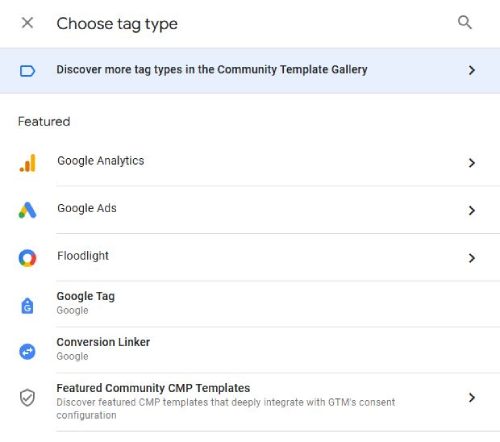
Step 3: Set up the trigger for the tag as All page

Step 4: Name the tag as GA – PageView – All Pages and then select the GA ID variable that the user created earlier to assign to the corresponding tracking code.
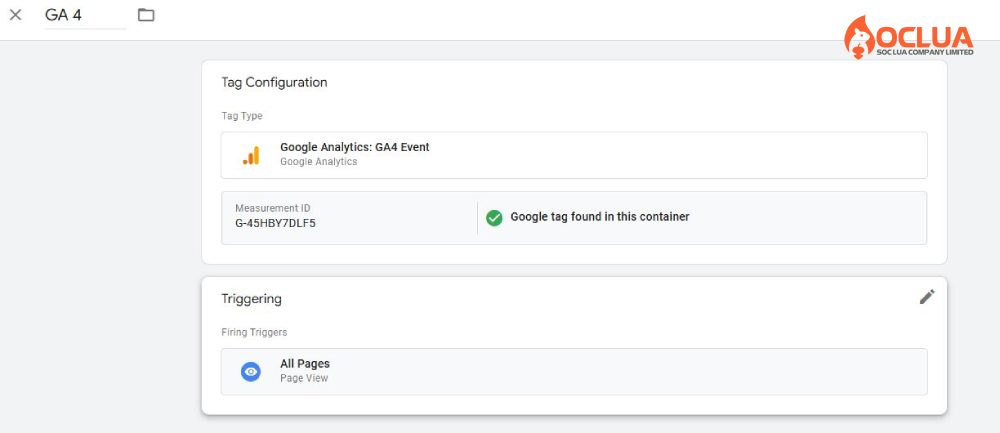
Step 5: Finally, click Save to complete.
Set up the call event
In the main interface of Google Tag Manager, click on the Triggers menu and select New to create a new one and select the trigger type as Just Links. In the next screen, set the trigger title with the corresponding name as Click To Call. Next, select Some Links Clicks to set up tracking with the links that users are interested in.
In the variable condition section, select Choose Built-in Variable.. then click Click URL. Next, set the filter condition Contains and the Tel value with the purpose of tracking when clicking. Then click Save to save the settings.
In the tag option as Google Analytics – Universal Analytics, in the Tracking Type section, select Event with the set values as Category (Call); Action {{Page Path}} and Label {{Click URL}}. In the Google Analytics Settings section, select the previously created GA ID variable. Next, in the Trigger section, select Click To Call and click Save.
Set up the order event
First, you need to determine the URL of the order completion page. If the website uses WordPress + WooCommerce, the order completion page is as follows:
[website domain] / checkout / order-received / order-code /?key = key
To check if the page has displayed text, you should rely on the text /order-received /. If your website is different, try ordering directly on the web and see what the last page link is.
Now create a new trigger for the order confirmation page. In there, select the trigger type as Page View. Name the new trigger Web Purchased, then select Some Page Views and set the Page Path condition to contain the text /order-received /. Finally, click Save.
Next, create a GA – Event – Purchased tag by selecting the tag type as Google Analytics – Universal Analytics. Then select Event with the settings values in turn Category (Purchased); Action {{Page Path}} in the Tracking Type section. In the Google Analytics Settings section, select the previously created GAID variable. Now select Web Purchased in the Trigger section and click Save to complete.
Publish Google Tag Manager
After completing the above operations, you can start using Google Tag Manager to track conversions. However, to make the tags and triggers work, publish GTM. In the main interface of Google Tag Manager, select Submit in the right corner to enable the trigger.
In the Submission Configuration section, fill in all the required information and click Publish to proceed with publishing Google Tag Manager. When finished, if there are no problems, the screen will display a message that you can use GTM to track conversions on the website.
Install Google Analytics 4 via Google Tag Manager
In the main interface of GTM, select New Tag and name the tag in the next window, then select Tag Configuration and Trigger.
In the tag configuration option, users can set up with the tag type option à Google Analytics: GA4 Configuration from the list.
Now, create a data stream for the new Google Analytics 4 property with options including web, Android app or iOS app.
If you choose Web as the data stream, you will need to provide information about the website such as URL, stream name, or configure Advanced Measurement settings, then click Create stream.
Next, copy the measurement code and enter the code on the Google Tag Manager browser. In the Trigger, select All page and click Save to set up the action.
After completing the operations, click Submit to save the changes. In the next window, enter the version name, and description and click Publish. If you install it successfully, you will see the system providing data when accessing the website.
Setting Up Google Remarketing Tag via Google Tag Manager
If you want to set up and run Google Remarketing ads on GTM, you need to create a Google Remarketing tag through Google Tag Manager by selecting Tag, then click New and choose the Google Ads Remarketing Tag.
Once the tag configuration screen appears, you should enter the Google Ads conversion ID into the Remarketing tag. Afterward, configure the settings and click Activate, then select All Pages, and finally, click Save and Send to complete the process.
This article has provided useful information about the tag management tool on websites, helping businesses understand customer behavior to implement effective marketing campaigns. By now, you should know what Google Tag Manager is and how to set up and use this tool!
Frequently Asked Questions
There is no limit to the number of Google Tag Manager (GTM) tags that can be added to a website. GTM, provided for free by Google, allows you to manage and implement multiple tracking tags from different services on the same website more easily. This is beneficial for businesses, as it enables them to track and monitor activities and data from various sources on the website.
To verify whether the GTM code has been successfully implemented, you can use Google Tag Assistant to ensure that the tags are correctly installed on your website. If you have installed GTM and checked it with Google Tag Assistant and see a yellow alert, it may be due to the tracking tags in Google Tag Manager not being configured correctly. To resolve this, create a new tag and add it to GTM. If Google Tag Assistant turns green, it means the tag has been successfully added.


